|
By popular demand! I have had so many requests for instructions to installing my stepping stone pathway that I have decided to put the instructions online. This page should give you all the information you need to duplicate my process of installing my pathway using stepping stones and the natural clay soil in our area.
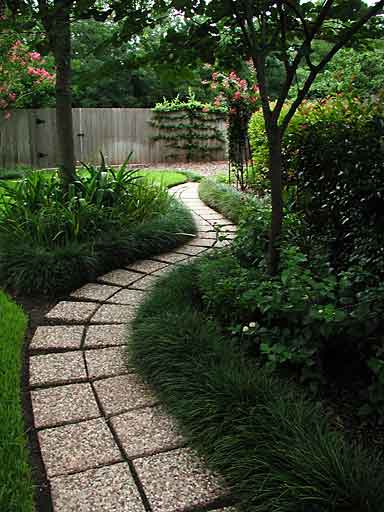
We had a problem with drainage in our backyard, and we needed a way to resolve the problem. The builder had not sloped the yard on the side of our house correctly so the water could not drain. At the same time, we wanted a pathway in which we could walk and enjoy our gardens. We also needed something that would allow the water to drain from our backyard, but would prevent armadillos from digging under our gate to get into our backyard. So we decided to install a stepping stone pathway. |
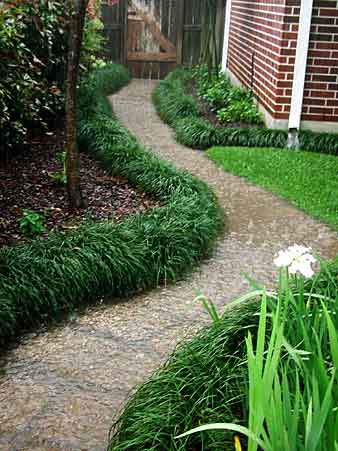
We could walk on the pathway when it wasn't raining, and when it did rain, the pathway turned into a fast draining riverbed to guide the water out of our backyard. The stepping stones could be placed directly under our gate, leaving a gap large enough for the water to pass through, but small enough to prevent armadillos from entering. The stepping stone pathway achieved all of these goals, and it looked good too!
CAUTION!The method I used to install my pathway requires doing work that can cause injury if not performed very carefully. The stepping stones are very heavy to lift. They are also very scratchy which can hurt your hands. Also, the method I used to install the pathway creates a very muddy mess that becomes extremely slippery! I almost slipped and fell a few times myself. Be extremely careful if you attempt to install a pathway using this technique. |
|
Materials List
- Leather Gloves - This will ruin the gloves, but they are necessary to protect your hands.
- Stepping Stones - I used 14" concrete/rock stepping stones, but any reasonably flat stepping stones should work.
- Clay Soil - This technique might work with other types of soil, but I have never tried it with anything but clay.
- Water - Get your garden hose ready! I also recommend using a spray attachment so you can stop the water easily and conveniently when you aren't using it.
- Long Board - A 2" x 4" board, approximately 5' to 6' long.
- Short Board - A 2" x 4" board, approximately 6" long.
- Long Level - Approximately 36" long.
- Short Level - Approximately 12" long.
- Rubber Hammer.
- Garden Claw - This is optional, but I found it very helpful.
- Crow Bar - This is useful for lifting stepping stones that need to be realigned.
- Broom - An old, stiff broom is best. Used to clean mud off of the stepping stones.
- Clearing Tools - Use whatever tools you prefer for removing any grass, plants, or debris in the area.
|
Clear the AreaFirst, you want to remove the grass, weeds, roots and debris from the area in which you want to place your pathway. Be careful to not harm existing trees or plants by damaging their roots. Our gardens were still young so we did not have problems with roots in the area yet. You want to clear the area to be reasonably level, but it's okay to leave it somewhat bumpy at this stage. |
Lay Out the Stepping StonesLay out the stepping stones in the general design you're trying to create. I used 14" square concrete/pebble stepping stones, but any flat stepping stones should work. This step allows you to figure out the spacing between each stepping stone and to design the curves while it's still easy to rearrange the stepping stones. Of course, the stepping stones will not lay down flat quite yet. This is just a rough draft of your pathway.
Water the Area ThoroughlyIf your clay is anything like mine, it becomes hard as a rock when it's dry. The only way you can build a pathway using the clay is to get the clay very wet. You can either water the area very deeply the day before you begin your work or just wait for a good, soaking rain. Water is a key element in the installation of a smooth and solid pathway.
Make Mud PiesHere comes the fun part. Make mud pies! Yes, just like when you were a kid! Remove a few of the stepping stones so you can work with the clay underneath. Work with the clay for only one or two stepping stones at a time as the clay will dry out very quickly. Get the clay very wet, and use tools and your hands to mix the clay and water until you get a gooey mud pie consistency. This gooey mud pie will become the mortar that will go underneath and between the stepping stones. |
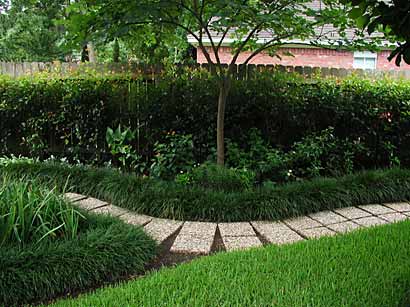
The backyard is sloped to drain the water around the sides of the house and out the front. This shows the water being directed into the pathway. Also notice how the grass slopes upwards in this area; this is where the builder incorrectly sloped the soil. Now imagine how much flooding we had in our backyard before we installed the pathway!
|
I preferred to use a garden claw to begin stirring up the clay with the water. As the clay and water became mixed, I then used my gloved hands to further mix the clay and water to a reasonably smooth consistency. It's okay to have small lumps (approximately 1" in diameter) in the mud pie mixture, but you should break down any larger clumps.
I mixed the clay and water to a depth of about 3" to 4". The level of this mixture should be taller than the level needed for the stepping stone. This is necessary so you can squish the stepping stone into place, allowing the mud pie mixture to ooze out the sides. This helps ensure a strong contact between the clay and the stepping stone and aids in leveling the stepping stone.
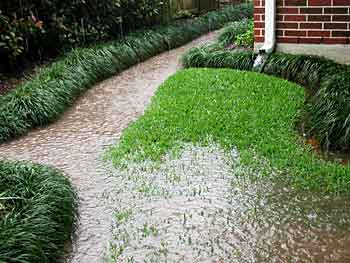
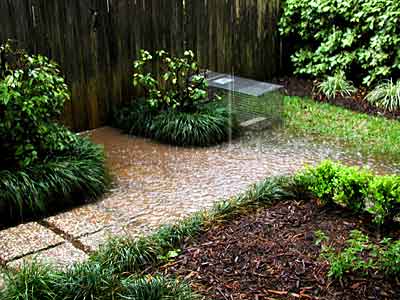
The pathway is able to handle a large amount of water very quickly and efficiently.
|
Place and Level the Stepping StonesPlace the stepping stones exactly where you want them to go. Only work with just one or two stepping stones at a time. If the clay begins to dry out, just add water and mix it again.
The first few stepping stones will be the hardest to level precisely. Don't worry if these stepping stones are off a little. Once you have more stepping stones in place, you can always go back and reseat any stepping stones that are too high, too low, or out of alignment. |
After you get the first 4-5 stepping stones in place, the board will serve as a good tool for leveling the pathway. Any stepping stone that is too high will receive your full body weight which pushes the stepping stone down into the mud pie mixture. As each stepping stone becomes level with the other stepping stones, your body weight is distributed among all of the stepping stones, making your body weight too light to push them all down. This levels all of the stepping stones together so you will have a smooth pathway. If you're using large stepping stones like I used, you might want to move the board to different sides of the stepping stones until you get the levels right. Also, be sure to use the small level to ensure that the stepping stones do not tilt sideways.
Align and Adjust the Stepping StonesAs you squish the stepping stones into place, you will notice that they will try to slide out of place. To put it back into place, use the small board and rubber hammer. Place the end of the board on the stepping stone, and hit the other end of the board with the hammer until the stepping stone moves into place. Be prepared for mud to splatter everywhere, including on your face! Protect your eyes. |
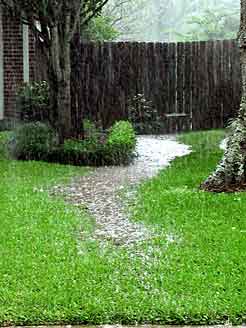
So how deep is that water? Well, it's this deep!
|
Ensure a Smooth PathwayAs I worked, I also slid the long board down the pathway to find any high spots in the stepping stones. If the board jammed on a stepping stone, that meant it was too high and needed to be lowered (if the board jammed on the stepping stone, I figured it was high enough to make someone trip while walking on the pathway).
If at any time you have a stepping stone that just won't go into place, pull it up and remix the mud pie mixture with extra water. Replace the stepping stone, and use the long board to "wiggle" the stepping stone down into place. The suction created by the mud pie mixture is very strong, but you can easily break this suction and pull up a stepping stone with a crow bar.
The water drains under the gate and down the front yard between the houses. The water is joined with the drainage water from my neighbor's yard.
|
Fill in the GapsAs you work, be sure to fill the gaps between the stepping stones with more of your clay mud pie mixture. Just take a glob of mud pie mixture and place it in the gaps between the stepping stones. You can use your small board to scrape off any excess. This process is very similar to placing grout between tiles. |
Let it DryAfter you get all of the stepping stones in place, do not walk on the pathway until the clay has dried. I found that the pathway was reasonably dry after approximately 24 hours, but I recommend waiting at least 48 hours to be sure. Once the clay has dried, you can walk on the pathway without worrying about the stepping stones shifting from their position.
If you must walk on the pathway before the clay has dried, be sure to place boards across the pathway so you don't put your full weight on any single stepping stone. Always keep your weight distributed among several stepping stones until the clay dries.
Clean UpAfter the clay is finally dry, you can begin to wash off the muddy mess on top of the stepping stones. Use your garden hose and a broom to scrub off the mud. If the water begins to pool anywhere, that's a sign that you're level is off. You can pull up those stepping stones, remix the clay into "mortar", and level that section back off using the board technique again.
After you finally get everything the way you want it, finish washing off the stepping stones. Don't worry if the clay between the stepping stones isn't perfectly level with the stepping stones; it will naturally wash off a little more shallow -- which is actually quite nice looking and helps to channel the dirt off of the stepping stones, helping to keep the pathway looking clean. |
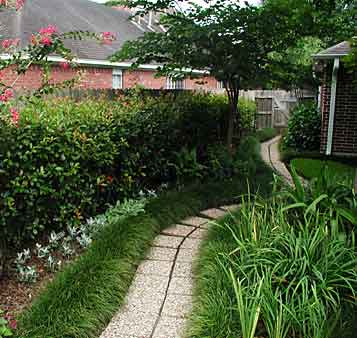
Once the water is directed into the front of yard, it has no problem draining all the way into the street where it makes its way to the storm drains on the sides of the street.
|
Enjoy!That's it! The actual process is pretty easy, but it takes a lot of fiddling and fidgeting with each stepping stone to get it just right. After clearing out the grass in the area and getting the ground it reasonably level, it only took a day to actually lay down the stepping stones into the mud pie mortar.
My pathway has been in place for almost 10 years now, and it still looks excellent! Only a few stepping stones have shifted over the years (only a fraction of an inch of movement). We've walked on it, have had lawn mowers, wheelbarrows, and a wagon carrying several bags of mulch pushed over it, and have lots of trees and shrubs growing all around it, and the pathway has continued to hold up beautifully. It has survived many rains without a problem, channelling the water out of our backyard, and we can walk on it at any time, wet or dry. The rain does not make the clay loose enough for the stepping stones to sink when we step on them, even during/after a rain.
Happy Pathways! :-)
|
|